Sourdough Sandwich Bread 1 (Enriched, One Day Ferment)
- Rachel

- Mar 20, 2020
- 4 min read
Updated: Dec 17, 2025


I cannot stress enough how delectable this is. Soft and airy like a cloud of bread you want to live in forever. And the flavor is more sweet and full-bodied than any regular white bread! Finally a soft white sandwich-loaf style bread that's completely sourdough! Another cool thing is that the process is nearly identical to normal yeasted bread, just takes longer to rise is all. I highly recommend you try this out! You can use it to make sandwiches, french toast, toast, croutons, or honestly just eat is straight after baking, with or without butter! When it's 2-4 days old you can use it for french toast!
The recipe is modified from: https://www.akneadtobake.com/post/sourdough-sandwich-bread
The recipe is here, and pictures of the process are below:
Ingredients:
300 g discard sourdough starter (Not fed for 12-24 hours)
260 g water
160 g milk
720 g bread flour (you can switch out up to 360 g for whole wheat flour, this will make it denser)
14.4 g table salt
60 g sugar
96 g soft salted or unsalted butter
Directions:
Sourdough Note: I use my sourdough 8-16 hours after feeding, with increased time leading to more sourness and greater density.
In a small saucepan warm the milk and water together until they reach 90-100°F.
In a medium bowl mix together the salt, flour, and sugar. Set aside.
In a large mixing bowl add the starter and milk + water mixture. Mix well. I used a thin wooden spoon handle to mix.
Then add in 1/3 of the flour mixture, mix well.
Add in the softened butter and the 1/3 more of the flour mixture. Mix until all the flour is hydrated, about 2-5 minutes. It will start forming a dough.
Add in the rest of the flour and mix/knead until it's all hydrated, about 5 minutes.
Take the dough out onto a lightly floured surface and knead 10-20 minutes, or until it passes the windowpane test. I only added ~10 g more flour. The dough will get less sticky and more firm as you knead.
Place the dough in a buttered bowl and lightly butter the top of the dough. Cover and rise in a warm place for 1.5-2 hours, or until doubled. I use my turned off oven with the light on.
To make two loaves cut the dough in half on a clean surface. Roll out each into a flat rectangle and then roll up like a snail, pinching the opening closed and tucking in the ends. Shape them and place them into your buttered loaf pans.
If making buns cut the dough into 16-20 pieces and shape into small dough balls. Make sure the rolls and loaves have a tight surface area on top, place them in a parchment lined or buttered pan with space in between them.
Lightly butter the top of the loaves/buns. Top with greased plastic wrap and let rise again for 3-4 hours in a warm place, or until about doubled size and they pass the "poke test": if you lightly poke it with a finger into the dough in multiple places and it slowly springs back but not all the way.
Bake loaves at 375°F for about 30 minutes, or until golden brown and 200°F internally. Buns usually need between 20-25 minutes. Optionally brush with soft butter as soon as they're out of the oven.
Let loaves rest in the pans for 5 minutes and then remove and cool at least 1-2 hours before cutting into, the longer you wait the less quickly your loaf will stale!Remove buns from the pan and let cool 15-20 minutes before serving.
Makes 2 800 g loaves. Cover and store at room temperature up to 5 days, or in the freezer up to 3 months.

In a separate bowl, whisk together flour, salt, and sugar. Set aside.

I fed my starter about 16 hours before. As you can see it about doubled in size before falling.

Add the starter to a different bowl (this will be the main mixing bowl). Mine was quite liquid.

Then mix in the warm water and milk. Now we'll start gradually adding the flour and mixing in.

After mixing in 1/3 of the flour mixture. Then we add the softened butter before mixing in the next 1/3 of the flour mixture.

After mixing in the next 1/3 of the flour. Starting to form a dough!

After mixing in the last 1/3 of the flour! It's now a dough and we can knead it! I kneaded about 15 minutes.

After kneading! Nice and smooooth.

Place in a buttered bowl and butter the dough. Cover and rise 2 hours in a wam place.

I let it rise in the turned off oven with the light on.

After rising! The goodest boi. Now we'll cut it up and shape it!

Cut him in half!

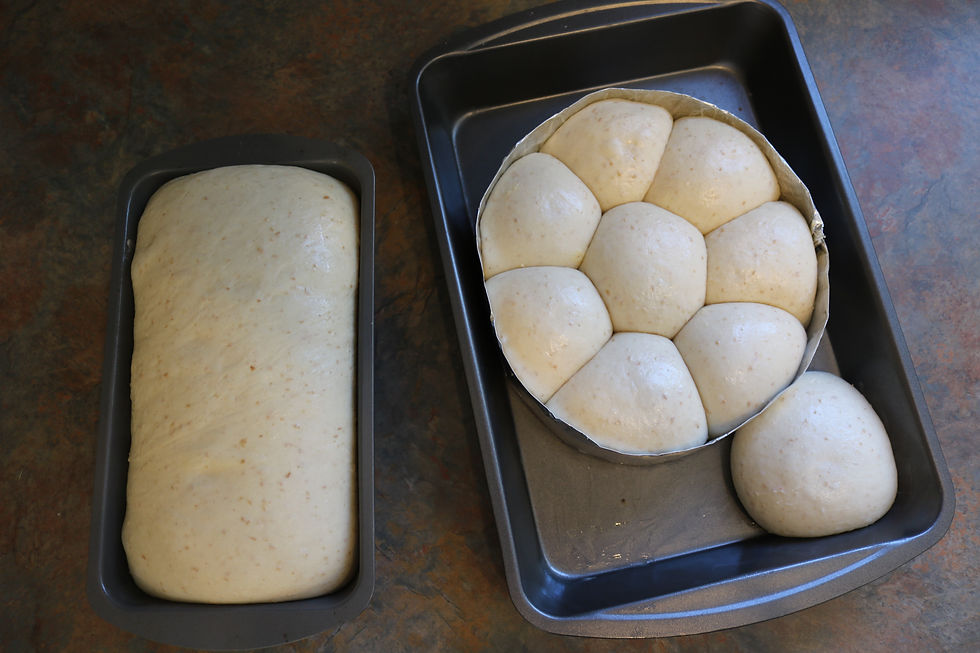
I shaped one half into a loaf and the other half into buns! Check out youtube for how to shape loaves and buns! The bun outside the circle was one too many for the ring I made Yes I could have made the buns without the ring but I wanted them to be shaped like my mom's!

Before rising.

Before rising.
Now we'll cover and let rise about 4 hours!

After rising. Look how puffy they got!!

After rising!

After rising.
Now time to bake!!!

BBAAAKKEEEDD!!!

The buns are done! The bottoms were quite dark, almost burnt, because I had them in for 28 minutes and I think they needed less time. But still f'ing soft and delicious!

The loaf!

The bottom of the loaf. Perfect!
Look at this sexy goddess of a bread!


Comments