
No Knead Pizza Dough
- Rachel

- Mar 15, 2019
- 3 min read
Updated: Jan 22, 2023


This unbelievable 12-18 hour fermentation dough recipe requires no mixer and yields a tender but slightly crispy and soft crust with lots of air bubbles! Similar to a pizzeria! It deceptively easy to make.
The crust recipe is here and pictures of the process are below:
Active time: 30 minutes
Total time: 13-19 hours
Ingredients:
Full recipe (4 pizzas):
1 1/2 cup warm water (350 g)
2 tablespoons olive oil (28 g)
¼ teaspoon dried yeast (0.6 g)
2 teaspoons salt (12 g)
3½ cups unbleached all-purpose flour (520 g)
Corn meal for dusting (optional)
Butter/olive oil for brushing (optional)
Half Recipe (2 pizzas):
3/4 cup water (175 g)
1 tablespoon olive oil (14 g)
1/8 teaspoon dried yeast (0.3 g)
1 teaspoon salt (6 g)
1 3/4 cups unbleached all-purpose flour (260 g)
Corn meal for dusting (optional)
Butter/olive oil for brushing (optional)
Directions:
The night/morning before:
In a large bowl add the flour, salt and yeast (place yeast and salt in separate places). Mix together.
Pour oil and water into the dry ingredients and stir with a wooden spoon/your hand. While mixing, add a little more water (if necessary). It will be a wet, shaggy dough (see picture below).
Shape into a ball and cover your bowl tightly with plastic wrap.
Rest dough at room temperature for about 12-18 hours out of direct sunlight. Do not move the bowl because this will pop air bubbles!
The next day:
The next day the dough will have more than doubled in size with lots of the bubbles on top (see picture below). It will smell fermented. Dust your hands and the dough with a little flour and gently scrape the dough out of the bowl and onto a floured surface. Don’t knock out (squish/pop) the air from the dough.
Cut the dough into 2-4 pieces and use extra flour to handle if needed.
Lightly knead each portion of dough just enough to form a ball. Cover with a bowl and allow to rest on a floured surface for 30 minutes.
Preheat the oven to 450°F.
Dust parchment paper with flour or corn meal. With floured hands gently stretch until it’s more circular. Place the paper and spread gently with your hands into a 10-inch diameter pizza (with thicker crust around the edge).
Then spread on sauce and add toppings and cheese. I like to sprinkle salt, garlic powder, Italian seasoning on top of the cheese. Important note: Don't add too many heavy toppings (see picture below) because they will weigh the crust down.
Easy baking method: Place the parchment paper on a pan and in the oven. Bake for 10-12 minutes on the middle rack. Then use broil (keep an eye on it!) to crisp up the cheese and toppings if desired.
Fancy baking method: (For a puffier crust). While preheating, place two equal sized pans on top of each other (or use a pizza stone) on the middle rack. When the pizza is ready to bake gently transfer/slide onto the preheated stone/pans and bake for ~10 minutes. Then use broil (keep an eye on it!) to crisp up the cheese and toppings if desired. You can also par-bake before topping.
Brush the edges of the crust with butter/olive oil when done baking (optional). Rest for 10 minutes before cutting.

Before mixing dry ingredients. Make sure to place the yeast (right) and salt (left) in different areas because salt inactivates yeast!

After mixing dry ingredients.

Before mixing in the wet ingredients.

After mixing in the wet ingredients. I needed to add ~2 more tbsp. of water to get the dough wet enough!

After covering the bowl with saran wrap and a kitchen towel. Now we wait 12-18 hours!
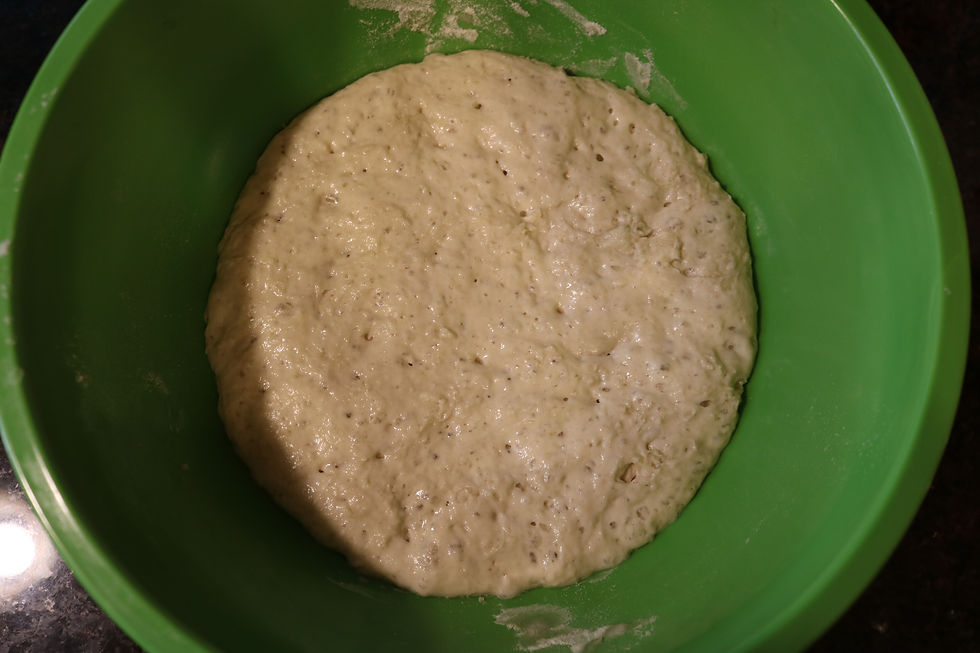
And this is what long fermentation does to the dough ball you saw just a few pictures ago. I know it looks weird but trust me it's good!

After gently peeling the dough out of the bowl and onto a floured counter (trying not to pop too many air bubbles!

After cutting and gently shaping the dough into balls and before resting (covered) for 30 minutes.

After resting for 30 minutes (they grew a little!)
Alright, enough nonsense, time to make pizza!

It is hard to explain the dough shaping process without seeing it for yourself, but it can all be done on the pan for those who are nervous about shaping it in the air with their hands. Anyway, this is what mine looked like. The outer edge crust (~1/2 inch) was thicker than the inside (~1/4 inch).

Time to dress her up! After adding my sauce.

This ended up being a tad too many toppings. The inner crust bakes to be quite thin so keeping the topping sparse in the center of the pizza is key so it isn't too greasy or floppy.
Also, I always sprinkle a little garlic powder and oregano/italian seasoning on the top before baking. It makes a world of difference!
Fresh out of the oven and looking spectacular!

Such great air bubbles and a wonderful texture for a crust!
Original recipe modified from: https://www.biggerbolderbaking.com/best-ever-pizza-dough/
Comments