
50/50 Whole Wheat Sourdough Bread
- Rachel

- Feb 29, 2020
- 4 min read
Updated: Jan 22, 2021


A toasty tasty loaf of glorious sourdough bread! When you add more whole wheat/grain you get an amazing deeper flavor without getting too dense The dough can also be a little trickier to work with because the bran can interfere with gluten development. But the process to make it is relatively easy if you have sourdough experience.
To make your own starter:
The recipe is here, and pictures of the process are below:
Ingredients:
100 g whole grain rye/wheat sourdough, fed 8-10 hours before
250 g bread flour
200 g whole grain flour (wheat usually)
8 g un-iodized salt
340 g room temperature water
Notes: 50 g of whole grain flour comes from the starter. If your starter is not whole grain you can reduce the bread flour and increase the whole wheat flour in the dough. Also, I've made this bread with starter fed 24 hours before and it was just as good.
Directions:
Mix together flours and salt in a large mixing bowl. Add starter and water. Mix by hand and mix very well. Keep folding the dough onto itself, while rotating, until a round dough mass forms that doesn't stick to the bowl too much (about 5-10 minutes).
Cover and rest 30 minutes.
First fold: Stretch and fold 12 times.
Cover and rest 2 hours.
Second fold: Stretch and fold 6 times.
Cover and rest 2 hours.
Third fold: Stretch and fold 6 times.
Cover and rest 1 hour.
Shape into a loose ball on a clean surface. Dust with flour and cover with saran wrap. Rest 1 hour.
Shape into it's final shape, with a taut surface area. But with whole wheat the bread can easily tear so don't be too rough with it.
Place upside down on a floured banneton or bowl with a floured tea towel. Dust the top (bottom of loaf) with flour.
Cover and rest overnight.
The next morning, preheat oven with Dutch oven at 500°F inside for 1 hour. The Dutch oven should be as close to the top of the oven as possible to minimize the risk of the loaf's bottom burning.
Cut out parchment paper that looks like a sanitary pad (just do it, the sides can be little handles to lower the bread into the Dutch oven). When the oven is fully heated, take bread out of the fridge and place it right side up onto the parchment paper.
Take the Dutch oven out of the oven. Score the bread and immediately place inside the Dutch oven. Cover and return to the oven.
Bake 25-30 minutes with the lid on. Then remove the lid and bake at 450°F for 10-15 more minutes. If you want really good browning use broils for a couple minutes just until toasty (it burns easily).
Remove from the oven and immediately remove from the Dutch oven and onto a cooling rack. Cool at least 2 hours before cutting into.
Can store covered at room temperature for ~3-4 days before it stales, or covered in the refrigerator for 7 days before is stales, or covered in the freezer up to 2-3 weeks. Suck the air out of the Ziploc bag if you store it on one.
A really good bread baking demonstration is here: https://www.youtube.com/watch?v=vmb0wWKITBQ

Mixed together the flours, salt, and added the sourdough starter. About to add the water and mix everything together.

After mixing the dough together. Shaggy mess, right? It will get better! Cover and rest 30 minutes.

After 30 minutes. Now we will do the first fold.

After the first fold. Now cover and rest 2 hours.

After 2 hours. It is flatter. Now do the 2nd fold.

After the 2nd fold. Now cover and rest 2 hours.

After 2 hours.
Then we do the third stretch and fold (which I forgot to take an "after" picture of...sorry!), cover, and rest 1 hour.

This was after the 3rd (and final) fold, and letting rest 1 hour. Now we will start shaping.

First shaping: top view

First shaping: side view. Then you flour and cover it for 1 hour before the final shape.

After resting 1 hour, top view. It flattened as you can see. Now we do the final shape!

After the final shape. Not super round but definitely a tighter surface!

Now we can place it (upside down) in the banneton and let it rest overnight!

In the fridge. I cover with some flour, saran wrap, and then a towel.

The next morning when the oven and dutch oven is preheated.

Scored and ready to bake! This is what I do: turn it out onto the parchment paper "sling" or pad i made, score it, and place it in the dutch oven using the "handles" of the parchment paper. You could score it in the dutch oven but that's dangerous...

Before baking, side view. A little flatter than we would like. Which could mean it's overproved, or that it's gluten development isn't strong enough (which we may not be able to help with whole wheat...). Now time to bake!

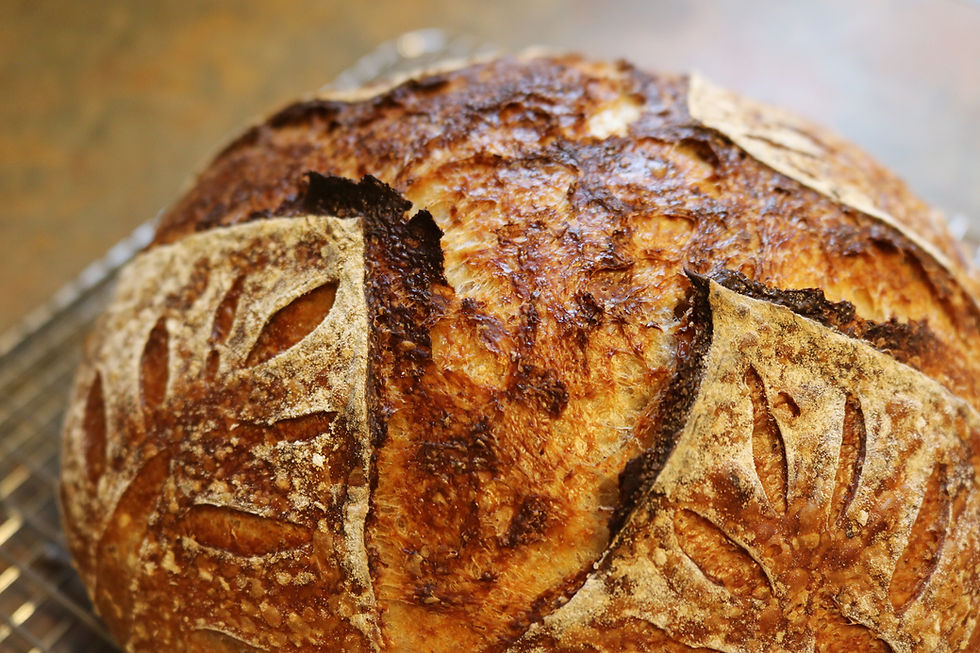
After baking!!! Used broil to get a deep brown!

Good oven spring! Not great but really good for a 50/50 whole wheat!

Bottom's a bit darker than I would like but not terrible!

Gloriously golden!!!


Hot and sexy. God damn
Comments